
[vc_row full_width=”stretch_row_content_no_spaces” full_height=”half_row_height” slider_images=”11948″][vc_column][/vc_column][/vc_row][vc_row full_width=”stretch_row_content_no_spaces” css=”.vc_custom_1522100642040{background-color: #7ea878 !important;}”][vc_column][/vc_column][/vc_row][vc_row][vc_column width=”1/12″][/vc_column][vc_column width=”8/12″][vc_row_inner][vc_column_inner][vc_column_text]
Articulated Gonatid Squid
[/vc_column_text][vc_column_text]
This pattern shows the use of Articulated Shanks to create a very mobile and realistic Gonatid Squid imitation. It also showcases an unorthodox use of Snow Runner. Snow Runner is a superior alternative to many synthetics and in this pattern a Snow Runner brush is created to form a body. This application could be used in a variety of patterns such as saltwater crab patterns, frog patterns, bait fish patterns that are trimmed to shape, etc.
List of materials:
– SRFS Articulated Shanks
– 10/0 Veevus GSP thread
– Snow Runner
– Angel Hair
– EP Sparkle Brush
– Clear Cure Goo Dumbbell Eyes
– Emu feathers.
[/vc_column_text][/vc_column_inner][/vc_row_inner][vc_row_inner][vc_column_inner][vc_column_text]

Figure 1
Figure 1: First create a dubbing brush from Snow Runner; in this case the purpose of the brush is to create a squid body that does not float, like deer hair, but has a good three dimensional profile. In order to do this the Snow Runner hair is cut in 4″ lengths, spread out over the wire and spun. The colours I have used mimic the body colour of the common Gonatid Squid.
[/vc_column_text][/vc_column_inner][/vc_row_inner][vc_row_inner][vc_column_inner][vc_column_text]
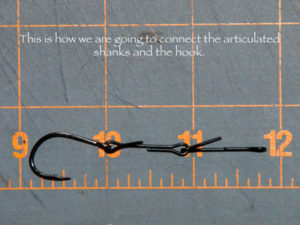
Figure 2
Figure 2: This is how we are going to connect the articulated shanks and the hook.[/vc_column_text][/vc_column_inner][/vc_row_inner][vc_row_inner][vc_column_inner][vc_column_text]

Figure 3
Figure 3: For now we will attach one section of the articulated shank to the hook and place it in the vice.
[/vc_column_text][/vc_column_inner][/vc_row_inner][vc_row_inner][vc_column_inner][vc_column_text]

Figure 4
Figure 4: Cover the shank with the thread.[/vc_column_text][/vc_column_inner][/vc_row_inner][vc_row_inner][vc_column_inner][vc_column_text]

Figure 5
Figure 5: Tie in EP glitter brush.[/vc_column_text][/vc_column_inner][/vc_row_inner][vc_row_inner][vc_column_inner][vc_column_text]
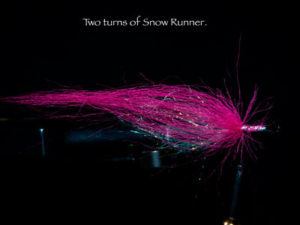
Figure 6
Figure 6: Two turns of Snow Runner brush (long, pink).[/vc_column_text][/vc_column_inner][/vc_row_inner][vc_row_inner][vc_column_inner][vc_column_text]

Figure 7
Figure 7: Tie in orange SR brush, mixed with copper, gold and silver angel hair.
[/vc_column_text][/vc_column_inner][/vc_row_inner][vc_row_inner][vc_column_inner][vc_column_text]

Figure 8
Figure 8: Take two turns of the orange SR brush.
[/vc_column_text][/vc_column_inner][/vc_row_inner][vc_row_inner][vc_column_inner][vc_column_text]

Figure 9
Figure 9: Tie in 5 or 6 emu feathers. Concave side out.
[/vc_column_text][/vc_column_inner][/vc_row_inner][vc_row_inner][vc_column_inner][vc_column_text]

Figure 10
Figure 10: Tie in the mixed short SR brush.[/vc_column_text][/vc_column_inner][/vc_row_inner][vc_row_inner][vc_column_inner][vc_column_text]

Figure 11
Figure 11: Tie in the Clear Cure Goo dumbbell eyes.[/vc_column_text][/vc_column_inner][/vc_row_inner][vc_row_inner][vc_column_inner][vc_column_text]

Figure 12
Figure 12: Place the eyes in position with a few wraps. Than apply super glue to the thread and continue to make wraps to secure the eyes.
[/vc_column_text][/vc_column_inner][/vc_row_inner][vc_row_inner][vc_column_inner][vc_column_text]
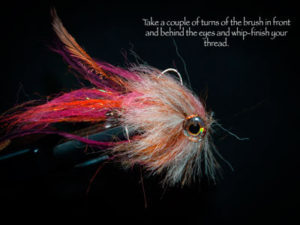
Figure 13
Figure 13: Take a couple of turns of the brush in front and behind the eyes and whip-finish your thread.
[/vc_column_text][/vc_column_inner][/vc_row_inner][vc_row_inner][vc_column_inner][vc_column_text]

Figure 14
Figure 14: Attach the next articulated shank to the previous one.
[/vc_column_text][/vc_column_inner][/vc_row_inner][vc_row_inner][vc_column_inner][vc_column_text]
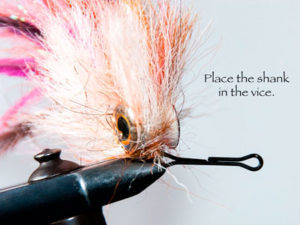
Figure 15
Figure 15: Place the shank in the vice.[/vc_column_text][/vc_column_inner][/vc_row_inner][vc_row_inner][vc_column_inner][vc_column_text]
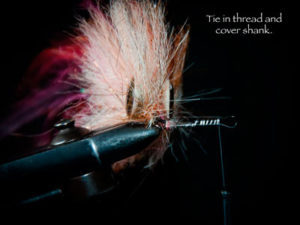
Figure 16
Figure 16: Tie in thread and cover shank.[/vc_column_text][/vc_column_inner][/vc_row_inner][vc_row_inner][vc_column_inner][vc_column_text]

Figure 17
Figure 17: Tien in the SR brush and wrap it all the way to the front. Whip-finish.[/vc_column_text][/vc_column_inner][/vc_row_inner][vc_row_inner][vc_column_inner][vc_column_text]
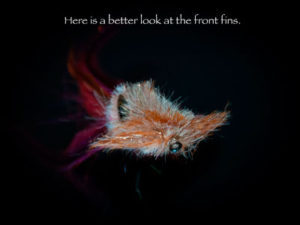
Figure 18
Figure 18: Front fins.[/vc_column_text][/vc_column_inner][/vc_row_inner][vc_row_inner][vc_column_inner][vc_column_text]
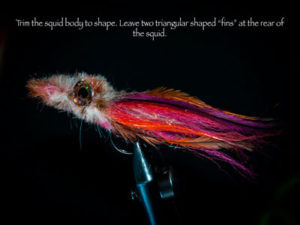
Figure 19
Figure 19: Trim the squid body to shape. Leave two triangular fins at the rear of the squid.
[/vc_column_text][/vc_column_inner][/vc_row_inner][/vc_column][vc_column width=”2/12″][vc_widget_sidebar sidebar_id=”sidebar2″][/vc_column][vc_column width=”1/12″][/vc_column][/vc_row][vc_row][vc_column][vc_empty_space][/vc_column][/vc_row]

